

So you want to build a home biodigester?
In my opinion the best place to start here in the Northeast of the United States (where I am currently a visiting faculty researcher at Mercy College New York) is with a Solar CITIES IBC DIY system as a base digester and a modified ARTI floating drum as a gas capture/storage system. I developed this in Germany at home, built one with my students at Mercy College in New York and then built one at the Kibbutz Lotan Green Apprenticeship Program.


Most recently we have built a two IBC home system in New Paltz New York in a basement, insulated and plumbed with PEX heating coils, to test throughout the winter (we have a similar twin IBC system at Mercy College which ran great all winter of 2013 indoors for a semester but was then moved outside with styrofoam insulation for the winter of 2014 and froze solid during the polar vortex months).


We favor 2 IBC tank (twin IBC systems) because each IBC is one cubic meter in fluid volume and this permits a maximum gas output of 1000 liters of uncompressed biomethane each day when fed approximately 25 liters of ground up food waste at 35 Celsius. 1000 liters of biogas permits approximately 2 hours of cooking on a single burner at a medium flame height. Since the reaction and production rate is temperature dependent and feedstock dependent (with an upper limit to how much you can feed) and both of these variables fluctuate, we have found that 2m3 is the best working volume for home biodigesters serving the cooking needs of 4 to 6 people. Two IBC tanks fit nicely into basements and are quite safe as they are always filled with liquid (water and ground up food waste after initial start up with animal manure as a source of microbial innoculant). We collect the gas in a floating drum outside the basement in the yard or porch where the liquid can be given anti-freeze properties by adding salt or other chemicals. One can also collect and store more gas in PVC bladders or baloons as they do in China (Puxin sells them via the internet) or in truck inner tubes or even air mattresses. To get the gas out then one needs a biogas pump, also sold on the internet from Puxin in China.
We at Solar CITIES favor jumping into the biogas field by building an IBC system because it is relatively inexpensive and robust, using ubiquitous found materials (used IBC tanks for between $135 to $175 each found on Craig's List, 2" and 1/2" PVC pipes, 2" inch and 1/2" Uniseals for tank penetration, PEX tubing for heat exchange, 2" inch and 1/2" PVC valves, elbows and unions, styrofoam insulation and stretch wrap.)
A 2 IBC system can be built, labor excluded (we're assuming you "DIY" Do-it-Yourself with friends and make a party of it like we do!) for about $600 or $700 in parts, depending on how much plumbing you have to do (this doesn't include the food grinder which you should really have for effortless push button feedstock preparation, which adds another $150 to $250 to the cost, and possibly a sump pump if your installation area isn't below your sink).

The nice thing is that you get into the game and learn to appreciate the physics, engineering, chemistry and biology of biogas systems this way, and you can't lose because you are really creating a liquid compost solution, regardless of how much gas you get or what temperature (above freezing) you keep the biodigester at. And the liquid fertilizer that comes out is superior to aerobic compost in many ways (retains all nitrogen and micronutrients, is maintenance free, with no turning or lifting needed and easy transport in buckets or pipes and hoses). So with a home biogas system you don't have to compost outside anything but twigs, leaves and branches and other woody material (whose aerobic disintegration is facilitated when biogas effluent is poured on it).
The Solar CITIES IBC Biogas system, which I've made an open source project* to encourage a community of biogas enthusiasts around the world to use collective intelligence to continue to improve, is one of the best ways for tinkerers to get involved in this evolving field of home waste-to-fuel-and-fertilizer production. But while I will always want to continue training people in the construction and use of DIY home made systems, things are rapidly changing in the commercial biogas world.
*(at the bottom of this post are some of the materials you need to build your own Solar CITIES style IBC based biodigester).
Overview of some Commercial Home Biogas Systems on the Market and on the Horizon
The world of home scale and intermediate scale biogas users is finally growing to the point where we are gaining traction not only at the tinkerer/bricolage level but in the marketplace at well.
Several home biogas companies are appearing outside of China and India (where there has been successful market penetration for some time now) and expansion is even occurring in the north temperate zones where seasonal temperature variations had previously discouraged people from taking an interest in this simple and effective technology (Northern European countries like Germany, Sweden and Denmark have been leading industrial scale biogas efforts for the past decade and a half, with million Euro facilities taking in both agricultural and municipal organic residuals; their size and thermal mass makes it feasible to utilize between 17% and 40% of the gas won each day to provide adequate heat in the colder months; it was generally considered that smaller scale systems located outdoors required too much investment in insulation and heating, and suffered too much heat loss due to surface area/volume ratio to make it worthwhile).
This equation is now changing.
Hestia Home Biogas in the Oregon/Washington area of the U.S. which has been building home biogas units using concrete forms for several years, is launching a rotomolded 2m3 home biodigester this August that has a patented design enabling lightweight plastic (polyethylene) units to be stacked for shipping with all parts inside. They can be set up in a couple of hours. The Hestia systems initial cost for early adopters will be about $2,495 for a basic uninsulated system and $2,895 for insulated systems with PEX heat exchangers designed for outdoor location in winter. The heating can be done by vacuum tube or flat panel solar HW circulation, of any other source of hot water (gas burner, electric heated water, groundsource heat pump, recycled shower water) circulated through the radiant heating coils. The systems are made to be as eco-friendly as possible, using a significant amount of post consumer recycled plastic in the rotomolding and enabling insulation from recycled polystyrene (styrofoam).
(In a recent facebook post to our group Solar CITIES Biogas Innoventors and Practitioners ( https://www.facebook.com/groups/methanogens/) Hestia CEO and inventor Warren Weisman wrote:
"New York City area biogas enthusiasts, if you are interested in a premanufactured home biogas digester, our company Hestia Home Biogas will have our 2 cu.m. home units available in July, 2014 and we will have a distribution center in Brooklyn. Anyone willing to drive their own car and trailer/pick-up to pick up their unit will be able to save shipping.
The units are $2,495 for the uninsulated units and $2,895 for the insulated "Arctic Pak." Both come with a double burner Puxin stovetop and come fully assembled. You only need to add water once you place it within view of your kitchen window so you can see the inflatable top and know how much gas you have.
The digesters have a built-in pressure relief system that allows them to be left alone for days or weeks and safely release gas."

As the market grows and mass production kicks in the goal is to bring the units down to the $1000 price point that WTP surveys suggest will reach the late adopters and make household biogas a household name.
In Israel at present, where temperatures get quite hot in summer but where winter lows have included snowfall, the start-up company Eco-gas Home Biogas has launched commercial biodigesters for the home and small institution. The units we visited in Mikhmoret with Envisaj Mercy Environmental Sustainability and Justice League students in January were 1 cubic meter, 2 cubic meters and 7 cubic meters in size; they build up to 12 cubic meters. Originally they were using fiberglass for their home units; now they have patented a vinyl flexible digester design that is easier to ship and can be set up in a couple of hours.

The family units currently sell for about $2500 to $3000 for early adopters as they grow their market but with mass production they estimate they will eventually get the costs down to below the $1000 price point. Shipping the fiberglass and plastic units outside of Israel previously limited the expansion of the market elsewhere but because the units now fold up into a rather small and lightweight box they should be able to rapidly penetrate other areas. Insulation ideas are now in development to make these systems work in colder climates.
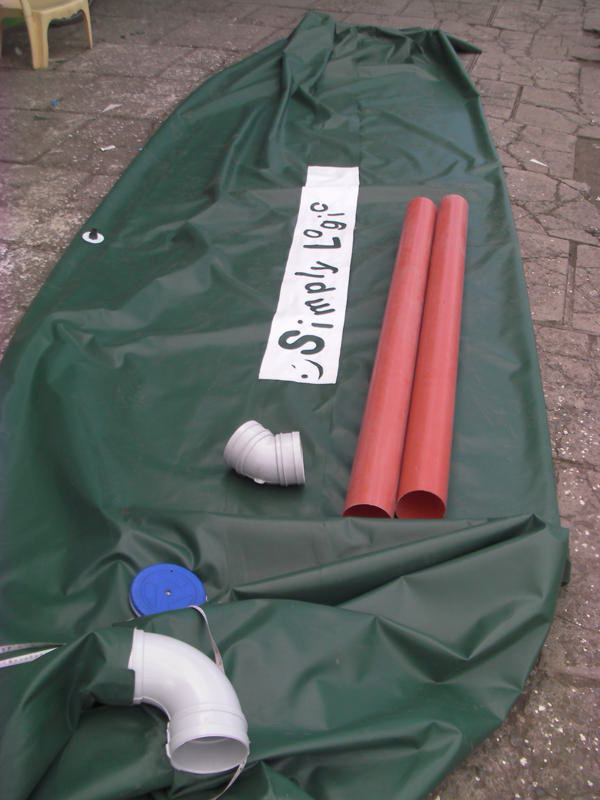
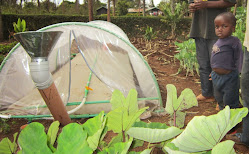
Across the continent of Africa, inventor and social entrepreneur Dominic Wanjahia has been rapidly expanding the business for his patented Simply Logic Flexi Biogas systems from their home base in Kenya to a dozen other nations. Flexi biogas, as the name implies, provides PVC systems that can be rolled up with the installation pipes and put on the back of a motorbike or bicycle, making it easy to get them to a remote village at a low cost in rural areas, which has been the target area for the company. The whole system, including the hoop shade house for protection, is about $500.
In China and India, of course, we find the widest variety of market entrants into the small biogas field.
The Chinese Puxin 2.5 m3 household digester is the one that I have worked with and imported to the Philippines and to Iraq.


The cost of these systems, made originally from fiberglass but now increasingly Polyethylene, ranges from $1500 to $2500. They are uninsulated as they are made for subtropical regions (Shenzhen, where they are produced, is near Hong Kong). The difficulty in adopting them in the US is the cost of shipping, but a West Coast company is now meeting with the Puxin group in China to discuss bringing a large shipment in to the US to keep costs down.
In India there is the widest variety of home biogas systems available for the market. Biotech India is one of the best known, with its innovative water seal for the floating drum.

With my students in Israel we visited a Biotech unit imported by Eco-gas Israel's Yair Teller. It performs well during the warmer months but is not insulated for winter; though the unit cost for the 2m3 family size is fiarly inexpensive, once again importation and transportation fees have made it hard to catch on in markets outside of India.
Sintex, the Indian rotomolding company, has some new home biogas designs that look promising; again the uninsulated nature of the products, designed for tropical regions, and the size and thus costs of shipping, make them difficult to get momentum behind in the north temperate markets.

At the intermediate to institutional end of the scale, the India Company Green Elephant Energy's new Green Box, a standardized prefabricated system that can fit on a flatbed truck like a 40 foot container and dropped into place, pioneered at the Volkswagen plant in Mumbai, is emerging as a cost effective solution for handling 1 ton of organic "waste" per day.

The units cost between $100,000 and $150,000 and are currently distributed in the US by Hestia Home Biogas on the West Coast. A spec sheet pdf describing their features and operation can be found here.
Meanwhile, my not-for-profit organization Solar Cities Solutions (currently undergoing a name change) has imported into New York the Chinese Puxin steel mold concrete forms for building 4, 6 and 10m3 biogas systems from poured concrete. The molds cost us about $10,000 with an additional $5000 to $7000 for for add-on supplies and shipping and customs. But the molds can be used hundreds of times.


A 10m3 system made from the molds, assuming the molds are already paid for, costs whatever the market price is for approximately 35 bags of cement and the necessary amounts of gravel and sand, plus the cost of a fiberglass gas holder (approximately $250) plus the cost of rebar and plumbing supplies, as well as labor and any machinery needed for construction not already on hand (we've built them using hand shovels and hand mixing of cement, but it is easiest with a backhoe and cement mixer). In Brazil we paid approximately $3000 for each 10m3 unit including all labor and machinery; in the Philippines where all labor was donated and we did things by hand we were able to make a 10m3 for about $1500 (but it took longer). We will be building on in Pennsylvania and another at the Permaculture Design Institute in Ellenville New York by October and testing insulation and heating and determining what the additional costs to make them perform well in the Northeast US will be.
Regardless of size or feedstock, the small scale biogas field is exploding, with many many options appearing that ultimately can ensure that ALL organic residuals, from toilet waste to yard waste to kitchen and cafeteria waste, to agricultural and market wastes, are no longer wasted but can be simply and effectively transformed from problems into solutions. And why not -- a biodigester is simply a stomach and can be made from anything that holds water, literally. So for people to say that small scale biogas "doesn't hold water" as a solution to our garbage problems is garbage. When we conceive of a biogas system as a living animal whose microbiome simply treats organic material as it feeds, we see the world has plenty of room for these rapidly evolving methanogenic and "fertilogenic" creatures at all scales -- a new addition to God's creatures, great and small.
-----------------------------------------------------------------------------------------------------------------------
How to build your own Biodigester the Solar CITIES way:
The animation I made shown above (created in Blender 3D) will work as a general overview of the systems we now advocate. It does however suffer from a couple of pre-revision mistakes.
1) The first is that it shows the gas output as a half inch valve located directly on top of the IBC. This works but leads to effluent spills when the gas is used up. In all of our builds now we use a 60 cm 1/2 piece of PVC extending from a half inch uniseal mounted in the same location on top of the tank, but extending up above the height of the influent and effluent buckets. This way even when the gas is all gone and the buckets are full there is no chance for fluid to fill the gas pipe. Simple and effective.
2) We are finding that sometimes the 1/2 gas out pipe gets clogged with floating debris from the original horse or cow manure innoculation. While this can be fairly easily cleared by blowing back into the tube, we want to avoid all hassles. We now recommend using a 1 inch uniseal for the gas out with alength of 1 inch pipe rising up to the height of the bucket and a reducer to half inch before the valve, which can be half inch. This way the pipe is less likely to ever get clogged.
3) Two IBCs are much better than one -- two cubic meters is more reasonable for producing good quantities of gas and by having two chambers, if one gets overfed and goes acid you still have a working system and can use the active tank to reactivate the inactive tank.
4) The animation doesn't show the PEX coils (100 feet rolls of red half inch PEX per tank) that we use as a heat exchanger to keep the tanks warm. These we insert through the IBC caps using 1/2 inch uniseals and PVC; it would be better to use CPVC, which handles the heat (PVC deforms at around 80 degrees) but we haven't found CPVC in the right sizes so far, so we compromise. Copper fittings would also be better but they are expensive.
5) The animation doesn't show insulation -- insulation is necessary to retain the heat (and you need to do warm water feeding when you feed). We use styrofoam sheets and stretch wrap and sometimes bubble wrap but there is a lot you can use. Just try to insulate the heck out of the tanks, particularly the tops (you don't have to worry much about the bottom as the IBC is on a pallette which creates an air gap.)
6) You don't have to build an ARTI style digester/floating gas holder to capture the gas. You can use used truck inner tubes and PVC balloons or bladders. The only problem there though is easily getting the gas out at a decent pressure. We use the PVC bags and biogas pumps supplied by Puxin from China for optimal results. See http://puxinbiogas.en.alibaba.com/product/316977761-22043592/Bio_gas_storage_bag.html


If I were you and you can't wait to bring a dedicated bag in from China, I would use an air mattress!
Try for at least 200 liters of storage (that's your half hour of cooking as it usually works out to be 15 minutes for every 100 liters). You will still need either a pump or some weight to get the gas out -- I've used throw rugs and occasionally simply asked the kids to lie down on the gas mattress while I cook...
7) If you make a floating gas holder you will probably have more reliable results for the central stabilizing pole using a bucket with cement to hold the pole. I didn't have cement/concrete when I built mine so I made the rickety metal stand out of galvanized plumbing pipe shown in the animation.
It works, but isn't ideal.
Now to the parts you need.
1) The first thing is of course two IBC tanks. Find them on Craig's List for between $125 and $175 each, used; some people provide free delivery if you buy two or more so that works out nicely.
2) You need to order Uniseals. Outside of Palestine and Israel I've not been to a hardware store that sells them (in Istanbul Turkey this past April we found some two inch rubber fittings that worked okay, but nothing for 1/2 inch or 1 inch). You can order them from Aussie Globe http://www.aussieglobe.com/uniseal1.htm and from Unites States Plastic Corp http://www.usplastic.com/catalog/item.aspx?itemid=89951,
You should order at least 12 2 inch uniseals, 5 1 inch uniseals and 15 1/2 uniseals. If I were you I would also order 5 3/4 inch uniseals while you are at it. They come in handy for lots of things. You aren't going to use them all, but in Israel at Kibbutz Lotan last January we destroyed a couple doing the installation and in New York a couple of weeks ago we found a damaged one in the shipment. They are rubber. Best to have extras on hand.
You will be using 4 of the 2" uniseals for each of your IBC tanks (one for the inlet and one for the outlet of the tank and one for the bottom of the inlet bucket and one for the bottom of the outlet bucket) so that makes 8, and you will use one for the floating gas collector feed in pipe if you decide to build that. That makes nine and leaves you with only three extra.
The inlet and outlet buckets will both need a half inch uniseal and the gas out will either use a half inch or a 1 inch or a 3/4 inch uniseal depending on how you decide to build. The PEX heat exchangers will each require two uniseals. The gas holder will have two 1/2 inch uniseals. So figure that each IBC will use up 5 1/2 inch uniseals and the gas holder 2 and that leaves you with 3 extra.
You may (and probably should) use 1" uniseals for the gas out of the tanks (for the reasons I described above to prevent clogging), you would thus have 3 extra of those if you order 5. And you can decide to do 3/4" as well... a lot of this depends on what size pipes and valves you can get, and if you can get reducers -- the smaller valves are much cheaper than the larger sized ones. Much bricolage is based on compromise and whatever local materials are available!

You can also get them from Amazon.com where they are known as Gamma Seal Lids, but they are more expensive (10 to 13 dollars)!

Note that if you are connecting your biogas system directly to the kitchen sink via the food grinder ("garbage disposal") you don't need an input bucket and if the rise of the pipe is tall enough (as it is when you build a system in your basement below the kitchen) you will still get water displacement through the pipes connecting the inlet of the tank to the upstairs sink. This is how we did it in New Paltz New York (see pictures at top of post).
4) You will need at least 30 feet of 2 " PVC pipe ($7.49 each for a 10 foot pipe at Home Depot); each IBC uses about 10 feet -- approximately 5 for the feeding inlet and 5 for the outlet pipe, so that is 10 per tank, plus whatever you need to connect to your food grinder wherever it happens to be!).
5) Get 5 two inch elbows and 3 two inch T's. At least. You will need 2 two inch PVC elbows and 1 two inch PVC T to create the manifold for the feed in pipes connecting the twin IBCs together (2 elbows and 1 T) . But then you need to connect this to your plumbing. For this you usually need at least 3 more elbows and two more Ts. The elbows are 90 cents and the Ts are $2.96 each unless you get the sanitary T's which are only $1.40 each and work just fine .
6) Get at least 4 2 inch PVC valves and 10 1/2 inch PVC valves. You will want to valve each of the feeding pipes to each tank independently and valve the whole feeding system, and a bypass drain in case you don't want to feed your tanks for some reason. And you need a half inch valve for each of the gas outlets and for each of the effluent buckets, as well as valving inbetween to the drain or garden. You can never have too many 1/2 inch valves I've found. The 2 inch valves are about $13 a piece and the 1/2 inch valves are about $3 each. Make sure you get slip to slip valves and not threaded.
7) Get at least 20 feet of 1/2 inch PVC pipe for the effluent overflow. Also get about 10 feet of 1 inch pipe.
8) Buy a 1 inch to 1/2 inch reducer.
9) Buy PVC primer and glue
10) Buy two rolls of 100 foot 1/2 inch PEX tubing and buy connectors to connect with 1/2 inch PVC.
11) Get two wheelbarrows worth of gravel and/or small stones/volcanic rock/bits of concrete/zeolite, whatever you can put at the bottom of the tanks in a layer about 10 cm deep for the microbes to live on.
12) Get at least 200 kg (like an oil drum or two worth) of fresh cow or horse manure for the startup innoculant of methanogenic microbes.
13) Get at least 4 1/2 inch threaded to 1/2 barbed brass nipples.
14) Get at least 4 1/2 inch female slip to female threaded connectors that you can screw the brass barbs into.
15) Get at least 30 feet (10 meters) of 5/8" outer diameter clear plastic hose to carry the gas. You can get 100 feet for $16.
16) Get at least 10 6 packs of polystyrene insulation panels at $7.25 each. This is for the sides of the tank. If you spend more you can get better insulation; this is the cheapest suggestion. You want to keep heat in!
17) Get a roll of stretch wrap (1000 feet for $22.97 usually does the job, but it doesn't hurt to get more)
18) Get at least two packs of rigid foam insulation for the top of the tank at $11.98 each. This stuff won't crack when you put things on top of the tank as inevitably you will!
There will be variation and you will probably have to make several runs to the hardware store to complete your installation, but this gets you going. I will update this post with more details as time permits.


No comments:
Post a Comment